I received my
Shapeoko last week which was extremely exciting. I ordered the full kit which (as the name implies) comes with everything you need to get started. Well, except for a jumper that is not documented (see below).
There are lots of little upgrades that you might want to look at still - the new baseboard and bumper switches being high on my list to get. It uses an Arduino for control (which despite 15+ years playing with embedded stuff I'd managed to avoid till now). I was really really really tempted to not get the electrical kit and make my own controller (after all it could basically use the software and hardware from
Sparky BGC and/or my
ESC) however I really want this to be a tool rather than a project in itself so sucked i up.
Of course I had to immediately start assembling, so that shot two nights of studying, but oh well. I snapped a few photos along the way.
Assembly
 |
| Stuffing all the bearings into these took forever and killed my fingers |
 |
| This gives a little spring to the z-axis in case of a crash |
 |
| The rollers for all the axes. I didn't notice at this point you should add the screw terminals if you want them. I figured I would solder but they were ultimately easier so I had to get them on later. Oh well. |
 |
| Finished X and Z axis |
 |
| End of night 1. Almost there - just the last mounts (which involved lots of tapping holes) and then on to electronics. |
 |
| And all finished! |
I did print a "Hello world" but it looks fairly ugly because of sloppy pen mounting so I will not show it :).
One thing to look out for though, is there is an error in the documentation unless I missed something. For grblShield it says to use $2=320 but the issue with this is that it assumes 2x microstepping on the z-axis. The way the grblShield comes configured, it is set for 8x microstepping. If you follow the instructions as written, your z-axis will only move 1/4 the amount it is meant to. You need to add a jumper for the z-axis to make it work properly (or probably $2=1280, but I did not run like this because it reduces the z-axis torque). You can find more information
here.
Toolchain / Workflow
Jumping in to CNC manufacturing is fairly overwhelming. I know a few things from work where we use Catia and a nice Hermle 5 axis (and by we I mean other people and I'm just peripherally involved). I spent some time reading around on various programs for both the CAD (design) and CAM (toolpaths) stage of things. My ideals were open source and runs nicely on a mac. I'm found something that satisfies it although it is possible I'll eventually fork over some money if these end up too limiting.
But I settled on two workflows, the former being the only thing I have used so far:
- Most things: FreeCAD for design and generating toolpasses with PyCAM
- Artwork: Blender with the BlenderCAM add on (I've used Blender previously)
I really like
FreeCAD so far because of the parametric modeling. I like the ability to simply type in the dimensions and angles and have it take care of the details. I recommend taking a look at
this tutorial. It also has a lot of similarities with what I learned from Catia. I'm using the 0.14 version right now, which I think isn't the official release. So far it's worked fairly well, although definitely has some bugs. So the first thing I did was a simple heart to try and convince my girlfriend this hobby is something she will like :).
I did this by using the draft mode to create the face (using two arcs and two straight lines) and then extruding that to make a solid. I realized afterwards this is NOT the right way to use FreeCAD so will talk about it later. From there I saved the shape as a .stl file and loaded it up in PyCAM.
For PyCAM I would definitely recommend getting it from the source. The precompiled version I could only get a really silly toolpath that ended up taking a solid hour to cut. Tons of lifting the spindle up and then down, cut a little, and repeat. Unfortunately I forgot to save a screenshot of that ridiculousness. Anyway with the latest version I used the "waterline" cutting pattern to generate essentially what I wanted.
Although it would be nice to have the path in something not red since for me red on black is super low contrast. Luckily since it is OSS I can change that :D. Finally upload that path through the universal gcode sender and cut away :). These videos were taken with the earlier version of PyCAM so you'll see more silliness in the path.
All of the cutting was done with the"
Solid Carbide 2 Flute" bit from Inventables using some scrap wood I had sitting around.
 |
| Happy Valentines day! |
One question I did have after playing with this: what is the best place to designate as "0" for the tool. Right now I'm putting it towards the top of the material and then zeroing the coordinate system. However that ends up making my waste board a little sad when the material isn't the precise depth. I'm thinking about zeroing out on the table surface so that it can simply start a little high, but then it gets awkward because you need to move the material in and out for zeroing.
 |
| Sad waste board |
More serious design
Now I knew the basics were working, I wanted to design something a bit more sophisticated. I'm trying to build a hinge that can be actuated in a fairly simple way and this will be a prototype of it. At this point I realized the right way to do this is using Part Design mode and creating constrained sketches. I'll defer to the
hackaday tutorial for details on how to do these things.
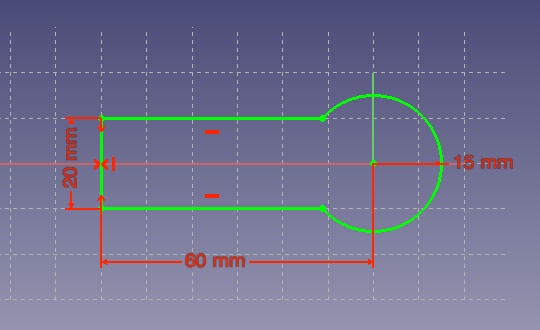 |
| Create the outline of the piece |
 |
| Make it a pad that comes up |
 |
| Make a sketch on the top face of how I want to shape a pocket |
 |
| Add the filets at the corner to make it machinable |
 |
| Get it fully constrained so it is valid. At this point it turns green. |
 |
| Make a pocket in the piece that is that shape |
 |
| And another pocket at the end to lower the profile of the hinge area |
 |
| And finally a hole for where the opposite piece will mount |
More serious CAM
From this model I exported the stl file and loaded it into PyCAM.
 |
| Here you see the model all loaded up. Note this time "0" is below the piece which I need to remember |
 |
| Tell PyCAM the bit I am using |
So the strategy for cutting things out I like is "waterline" which goes around the edges. However, because I need to cut a big chunk of stock out I need to do this first because the drop down area won't be caught by the waterline strategy. I'll do this but restrict it to the part of the piece that is relevant.
 |
| So a process named bulk removal that will be allowed to have some slop (0.5mm error) |
 |
| Bounding box that only covers the area I need to remove material |
 |
| Set up a task using these tools, strategies and area |
 |
| Which gives a pretty reasonable path |
Now that the stock is milled down there, waterline will work for the remaining area.
 |
| Use the waterline mode to cut around the edge |
 |
| Bounds that cover the whole model now |
 |
| Set up a task to generate the pass using the correct process and bounds as well as the right collision model |
 |
| And finally the tool pass to generate this part |
Cutting
I made a mistake the first time I generated this tool pass. I set the safety margin to 5mm which I had previously done when the "0" was on the top of the piece. In this case, that made the tool transverse between locations THROUGH the material. It took me a while to realize what was happening and it produced quite a mess. You can see this near the end of the video.
My second pass was almost perfect. However, right at the end when it finished the middle hole the whole thing was disconnected and started spinning around. That ripped it nicely and luckily only bent the bit and didn't break anything. You have to be sitting by the power switch on this thing!
To work around this I went ahead and added a support structure:
Which leaves it attached. However, I forgot to enable it for the collision detection so my second one almost went the same way. Luckily I stopped it in time and pulled the piece out. In the future I will definitely make sure to use supports properly and manually cut them when the piece is done.
Also for the final version I need to make sure the pocket inner cutting goes to the same depth as the waterline pass. That ended up not lining up perfectly and i'm not sure why yet.
Other component and finished!
I also machined the other side of the joint. This time I figured out how to use the grid cloning feature in PyCAM which was nice to make it one operation (which luckily didn't fail). This time I also got the supports to work properly.
Thanks Inventables
Both for making this available at a reasonable cost and having pretty good documentation. Also it just seems like a company run by people that are nice which is awesome. When there was a mixup on some shipping stuff they paid the difference even when I offered to, which is just really nice.


